حل مشکلات شبکه - کامپیوتر -سرور - مشکلاتی که روبه رو شدم

۷ مطلب در مهر ۱۳۹۵ ثبت شده است

تبدیل سر دوم کابل کنسول سیسکو از rj45 به rj11

http://bayanbox.ir/view/3105875337219447499/serial-cable-pinout-diagram-l-9c17a21107247084.png

http://bayanbox.ir/view/5278167848227186356/Rg45toRg11Convert.png

http://bayanbox.ir/view/3769426316269506200/pinoutCisco.png

http://bayanbox.ir/view/6396498654355807921/Capture.png

۰ نظر موافقین ۰ مخالفین ۰
رضا اسماعیلی

شکستن پسورد اکسل (برگرفته از سایت شاهجهانی)

یکی از کارآمد ترین روش هایی که خیلی سریع می تونید Protection رو از روی فایل اکسل بردارید و من اون رو از سایتjsbi.blogspot.com  پیداش کردم . جالبه بدونید که انواع نرم افزارهای مختلف حذف پسورد اکسل رو امتحان کردم و هیچ کدوم جواب ندادن الا همین Macro !

وارد منوی views --> Macros --> record Macro بشین و record macro رو انتخاب کنید و نامی را به ماکروتون اختصاص بدین و بعد دکمه ok رو فشار بدین . حالا دوباره از منوی view و macros گزینه view macros رو فشار بدین و stop recording  رو انتخاب کنید . دوباره ازمسیر قبل view macros  رو انتخاب کرده و اسم ماکرویی رو که درست کرده بودین رو پیدا کنید و دکمه edit رو فشار بدین .
حالا جای متن ماکرو متن زیر رو جایگزین کنید :

Sub Macro1()
'
' Breaks worksheet and workbook structure passwords. Jason S

probably originator of base code algorithm modified for coverage

' of workbook structure / windows passwords and for multiple passwords

' Jason S http://jsbi.blogspot.com

' Reveals hashed passwords NOT original passwords

Const DBLSPACE As String = vbNewLine & vbNewLine

Const AUTHORS As String = DBLSPACE & vbNewLine & "Adapted from Bob McCormick base code by" & "Jason S http://jsbi.blogspot.com"

Const HEADER As String = "AllInternalPasswords User Message"

Const VERSION As String = DBLSPACE & "Version 1.0 8 Sep 2008"

Const REPBACK As String = DBLSPACE & "Please report failure to jasonblr@gmail.com "

Const ALLCLEAR As String = DBLSPACE & "The workbook should be cleared"

Const MSGNOPWORDS1 As String = "There were no passwords on " & AUTHORS & VERSION

Const MSGNOPWORDS2 As String = "There was no protection to " & "workbook structure or windows." & DBLSPACE


Const MSGTAKETIME As String = "After pressing OK button this " & "will take some time." & DBLSPACE & "Amount of time " & "depends on how many different passwords, the "


Const MSGPWORDFOUND1 As String = "You had a Worksheet " & "Structure or Windows Password set." & DBLSPACE & "The password found was: " & DBLSPACE & "$$" & DBLSPACE & "Note it down for potential future use in other workbooks by " & "the same person who set this password." & DBLSPACE & "Now to check and clear other passwords." & AUTHORS & VERSION

Const MSGPWORDFOUND2 As String = "You had a Worksheet " & "password set." & DBLSPACE & "The password found was: " & DBLSPACE & "$$" & DBLSPACE & "Note it down for potential " & "future use in other workbooks by same person who " & "set this password." & DBLSPACE & "Now to check and clear " & "other passwords." & AUTHORS & VERSION

Const MSGONLYONE As String = "Only structure / windows " & "protected with the password that was just found." & ALLCLEAR & AUTHORS & VERSION & REPBACK

Dim w1 As Worksheet, w2 As Worksheet

Dim i As Integer, j As Integer, k As Integer, l As Integer

Dim m As Integer, n As Integer, i1 As Integer, i2 As Integer

Dim i3 As Integer, i4 As Integer, i5 As Integer, i6 As Integer

Dim PWord1 As String

Dim ShTag As Boolean, WinTag As Boolean

Application.ScreenUpdating = False

With ActiveWorkbook

WinTag = .ProtectStructure Or .ProtectWindows

End With

ShTag = False

For Each w1 In Worksheets

ShTag = ShTag Or w1.ProtectContents

Next w1

If Not ShTag And Not WinTag Then

MsgBox MSGNOPWORDS1, vbInformation, HEADER

Exit Sub

End If

MsgBox MSGTAKETIME, vbInformation, HEADER

If Not WinTag Then

MsgBox MSGNOPWORDS2, vbInformation, HEADER

Else

On Error Resume Next

Do 'dummy do loop

For i = 65 To 66: For j = 65 To 66: For k = 65 To 66

For l = 65 To 66: For m = 65 To 66: For i1 = 65 To 66

For i2 = 65 To 66: For i3 = 65 To 66: For i4 = 65 To 66

For i5 = 65 To 66: For i6 = 65 To 66: For n = 32 To 126

With ActiveWorkbook

.Unprotect Chr(i) & Chr(j) & Chr(k) & Chr(l) & Chr(m) & Chr(i1) & Chr(i2) & Chr(i3) & Chr(i4) & Chr(i5) & Chr(i6) & Chr(n)

If .ProtectStructure = False And .ProtectWindows = False Then

PWord1 = Chr(i) & Chr(j) & Chr(k) & Chr(l) & Chr(m) & Chr(i1) & Chr(i2) & Chr(i3) & Chr(i4) & Chr(i5) & Chr(i6) & Chr(n)

MsgBox Application.Substitute(MSGPWORDFOUND1, "$$", PWord1), vbInformation, HEADER

Exit Do 'Bypass all for...nexts

End If

End With

Next: Next: Next: Next: Next: Next

Next: Next: Next: Next: Next: Next

Loop Until True

On Error GoTo 0

End If

If WinTag And Not ShTag Then

MsgBox MSGONLYONE, vbInformation, HEADER

Exit Sub

End If

On Error Resume Next

For Each w1 In Worksheets

'Attempt clearance with PWord1

w1.Unprotect PWord1

Next w1

On Error GoTo 0

ShTag = False

For Each w1 In Worksheets

'Checks for all clear ShTag triggered to 1 if not.

ShTag = ShTag Or w1.ProtectContents

Next w1

If ShTag Then

For Each w1 In Worksheets

With w1

If .ProtectContents Then

On Error Resume Next

Do 'Dummy do loop

For i = 65 To 66: For j = 65 To 66: For k = 65 To 66

For l = 65 To 66: For m = 65 To 66: For i1 = 65 To 66

For i2 = 65 To 66: For i3 = 65 To 66: For i4 = 65 To 66

For i5 = 65 To 66: For i6 = 65 To 66: For n = 32 To 126

.Unprotect Chr(i) & Chr(j) & Chr(k) & Chr(l) & Chr(m) & Chr(i1) & Chr(i2) & Chr(i3) & Chr(i4) & Chr(i5) & Chr(i6) & Chr(n)

If Not .ProtectContents Then

PWord1 = Chr(i) & Chr(j) & Chr(k) & Chr(l) & Chr(m) & Chr(i1) & Chr(i2) & Chr(i3) & Chr(i4) & Chr(i5) & Chr(i6) & Chr(n)

MsgBox Application.Substitute(MSGPWORDFOUND2, "$$", PWord1), vbInformation, HEADER

'leverage finding Pword by trying on other sheets

For Each w2 In Worksheets

w2.Unprotect PWord1

Next w2

Exit Do 'Bypass all for...nexts

End If

Next: Next: Next: Next: Next: Next

Next: Next: Next: Next: Next: Next

Loop Until True

On Error GoTo 0

End If

End With

Next w1

End If

MsgBox ALLCLEAR & AUTHORS & VERSION & REPBACK, vbInformation, HEADER
'
End Sub
  در انتها هم دکمه run رو فشار بدین تا ماکرو اجرا بشه و تمام !

۰ نظر موافقین ۰ مخالفین ۰
رضا اسماعیلی

حل مشکل uncheck شدن show hidden files

Fix Show Hidden files and folders not working Problem in Windows

If Show hidden items option is not working in your Windows 8 or in any other versions of Windows ( “Show Hidden files and folders” in other versions of windows), This article will help you to fix the problem.

Viewing hidden files and folders in Windows is really easy but then also, some serious Virus like Trojan horses take a toll on your PC and does certain harms to your computer by sitting quietly at a corner of you PC. You are least aware of its contribution towards the growing menace and of the effect experienced is the disability to view or hide hidden items. The basic procedure to view hidden files in Windows 8 is to open Windows Explorer and go to View and check the option Hidden Items or uncheck if you don’t want to display the items. Problems in doing this starts as a result of virus attacks. The virus implements Shockwave.dll policy which makes your hidden files hidden forever. Sometimes antivirus may fail to protect you. The following solution may serve your purpose.

Fix hidden items not working

Steps to show hidden files by editing Registry file

1. Open Windows Charms Bar (Windows Key + C), go to Search, type regedit and press Enter.

Registry Editor

2. Registry editor opens and navigate to the following location

HKEY_LOCAL_MACHINE\SOFTWARE\Microsoft\
Windows\CurrentVersion\Explorer\Advanced
\Folder\Hidden\SHOWALL

Show all location

3. In the right hand pane, see there is Checked Value whose Type is REG_DWORD. Double click on it and check if the default value set is 1. Because virus changes the value to 0 or 2.

Checked value type

4. It may happen that your key has been deleted or exists but with a different type. If the key has a different type, delete it and create a new key. Right click in an empty space in the right hand side pane, go to New-> Select DWORD(32 bit) and name it Checked Value. Double click on the newly created key and set the value to 1.

My Documents Properties

5. Another important thing to remember is to check that the key Type has type REG_SZ and value is set to Radio. If any of these criteria are altered by virus, problems arise . So change it to the mentioned settings. Now if you check the Hidden Items your problem should have been solved by now.

Type

But what if you Registry Editor itself has been disabled by virus?

Go through the following steps.

1. Open Run (Windows+R)-> type gpedit.msc and press Enter.

gpedit msc

2. Go to the following location User Configuration -> Administrative Templates -> System

System location of lgpe

3. In the right hand side, find out the setting Prevent access to registry editing tools. By default the state should be Not Configured. Double click on it.

Prevent access to regedit

4. Check the option Not Configured. Thus your Registry Editor will be enabled. Restart your machine to get the changes in effect.

Not configured set

۰ نظر موافقین ۰ مخالفین ۰
رضا اسماعیلی

جا به جایی User Acount ها از دامینی به دامین دیگر با استفاده از فایل های CSVDE

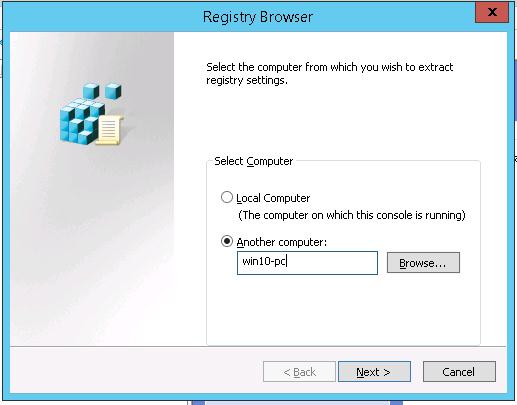
 در این محیط آزمایشی از دو دامین متفاوت در فارست های مختلف استفاده می کنیم. دامین اول TEST.lab که ویندوز سرور آن 2008R2 می باشد و قرار است نام های کاربری از آن به دامین دوم TEST2.lab که ویندوز سرور آن نیز 2008R2 می باشد، منتقل شوند، به دامین اول می رویم، در این دامین از کاربران موجود در OU ای با اسم New Users خروجی خواهیم گرفت. 

Image


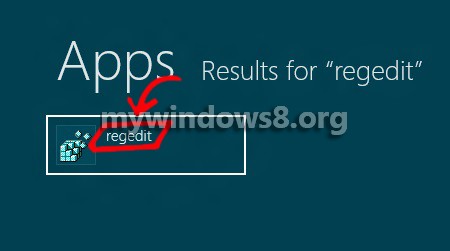
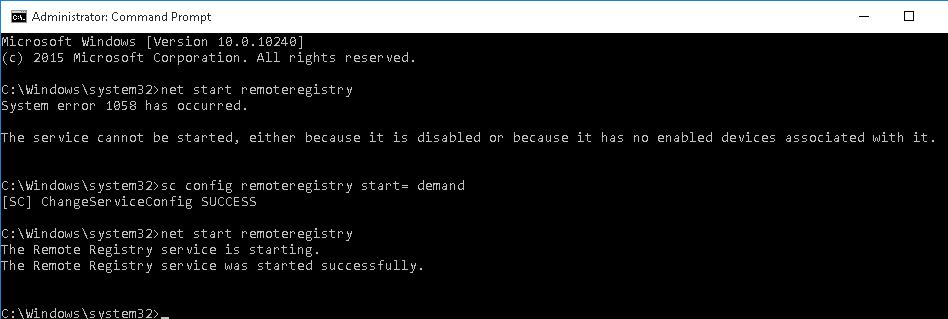
برای شروع داخل CMD ،Start Menu را Run as Administrator می کنیم. دستوری که داخل کامند پرامپت وارد می کنیم تا از نام های کاربری در قالب فایل های (csv.) خروجی بگیریم بدین صورت می باشد: 

1
csvde -d {LDAP Path} -f C:\filename.csv

که در این آموزش به شکل زیر می باشد: 

1
csvde -d "ou=New Users,dc=test,dc=lab" -f C:\ExportedUsers.csv


Image


بعد از فشردن Enter و اجرای دستور مذکور باید پیغام تکمیل شدن موفقیت آمیز آن برای شما نمایان شود. 

Image


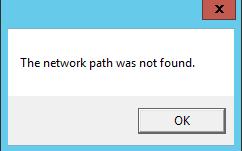
لیست کاربران مورد نظر خارج شد و اگر در حین اجرای این دستور با پیغام خطا مواجه شدید به صحیح وارد شدن دستور و همچنین آدرس LDAP Path دقت کنید. حالا فایل موجود را با استفاده از Microsoft Excel باز می کنیم. در این قسمت نکاتی وجود دارد که باید به آنها دقت کنیم.به احتمال زیاد سطر دوم باید به OU تخصیص داده شده باشد، می توانیم از این سطر چشم پوشی کنیم، ولی ممکن است OU مورد نظر شما در دامین دوم نام دیگری داشته باشد یا شاید ترجیح می دهید که OU مربوطه در دامین دوم را خود بسازید به همین خاطر باید سطر دوم به کل حذف شود، در این آموزش در دامین دوم OU ای با نام Network وجود دارد که OU هدف می باشد، به همین منظور سطر دوم حذف شد. 

Image


در این فایل ستون های بسیاری را مشاهده خواهیم کرد که نیازی نیست همه آنها وجود داشته باشند، بنابراین می توانیم به طور کامل ستون هایی که مهم نیستند را حذف کنیم. اما ستون هایی هستند که نباید آنها را از فایل حذف کرد که عبارتند از: 

1
2
3
4
5
6
7
8
9
10
11
DN
objectClass
ou
distinguishedName
name
cn
sn
givenName
displayName
sAMAccountName
userPrincipalName

بعد از پاکسازی ستون های اضافی فایل ما بدین صورت در خواهد آمد. 

Image


در این قسمت یکسری از جزئیات را که مربوط به دامین دوم می باشد را درست می کنیم، نظیر آدرس LDAP و همچنین آدرس User Principal Name را. از ترکیب کلید ها استفاده می کنیم و با فشردن همزمان 

1
Ctrl+f

پنجره Find and Replace داخل فایل Excel باز می شود. به تب Replace می رویم و در قسمت Find What تایپ می کنیم: 

1
DC=TEST,DC=lab

و در Replace With تایپ می کنیم: 

1
DC=TEST2,DC=lab

و سپس روی Replace All کلیک می کنیم. 

Image


با اینکار آدرس دامین دوم(TEST2.lab) جایگزین آدرس LDAP دامین اول می شود (TEST.lab). همچنین لازم است همانند مرحله قبلی نام OU از New Users به Network و نام دامنه در قسمت User Principal Name از TEST.lab به TEST2.lab تغییر کند. 

Image


Image


البته می توانیم قسمت اول و دوم را با هم ادقام کنیم و به ترتیب در Find What و Replace With بدین صورت وارد کنیم: 

1
2
OU=New Users,DC=TEST,DC=lab
OU=Network,DC=TEST2,DC=lab

فایل ما برای وارد کردن به دامین دوم آمادست، این فایل را با همان فرمت (csv.) نیز Save می کنیم و به دامین دوم منتقل می کنیم. 

Image


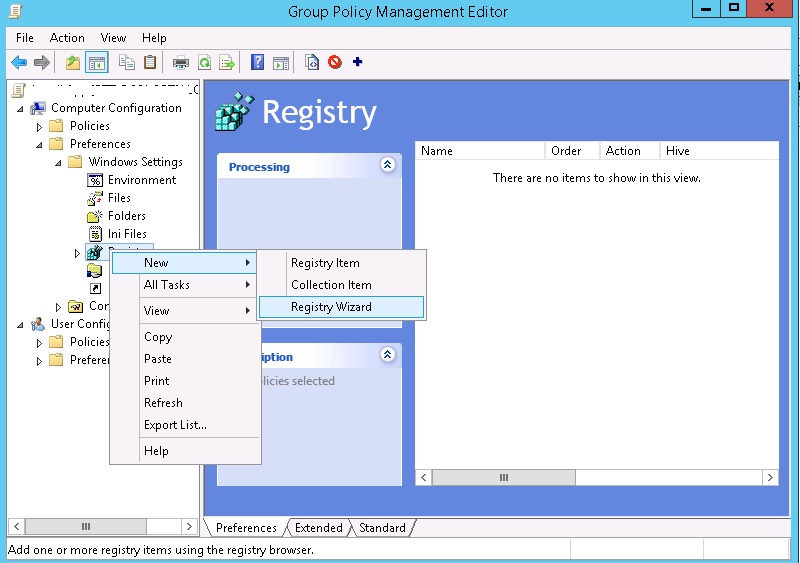
فایل مربوطه را داخل درابو C در دامین دوم کپی می کنیم. برای وارد کردن نام های کاربری CMD را به صورت Run as Administrator اجرا می کنیم و داخل آن دستور زیر را تایپ می کنیم: 

1
csvde -i -f ".csv File Path"

که در این جا باید وارد کنیم: 

1
csvde -i -f c:\ExportedUsers.csv


Image


و در پایان باید پیغام تکمیل شدن موفقیت آمیز دستور برای شما نمایان شود. 

Image


حال به کنسول Active Directory Users and Computers می رویم و به OUی Network می رویم و مشاهده می کنیم که تمامی کاربران موجود در OUی New Users به OUی مورد نظر در دامین دوم (TEST2.lab) منتقل شده اند. تمامی کاربران موجود در OUی Network غیرفعال هستند و برای فعال سازی آنها، همه نام های کاربری را انتخاب می کنیم و روی آنها کلیک راست و روی Enable Users کلیک می کنیم. 

Image


Image


امیدوارم که مورد توجه دوستان قرار گرفته باشد. 


منبع :

۱ نظر موافقین ۰ مخالفین ۰
رضا اسماعیلی

تفاوت TCP و UDP

پروتکل (transmission control protocol (tcp یک پروتکل ارتباط محور (connection oriented) است و عملکرد آن بدین صورت است که برای هر پکت ارسالی توسط کامپیوتر مبدا باید یک پکت ack از سرور مقصد مبنی بر دریافت صحیح و بدون نقص پکت دریافت کند . اگر طی زمان مشخصی این پیام ack توسط مبدا دریافت نگردد فرایند ارسال پکت مجددا تکرار خواهد شد و کاربر آن بیشتر در مواردی است که نیاز به اطمینان از صحت انتقال اطلاعات داریم مانند پروتکل های FTP , Telnet . http , SMTP , pop3 , …

پروتکل (User datagram protocol (UDP یک پروتکل بدون ارتباط محور (connection less) است . بر خلاف tcp در این پروتکل هیچ گونه پیام ack مبنی بر دریافت پکت از سوی سرور ارسال نشده و بیشتر در مواردی مانند انتقال صوت voip یا ویدئو که پهنای باند در این موارد از اهمیت بالایی برخوردار است بکار می رود زیرا در صورت استفاده از پروتکل tcp جهت انتفال این ترافیک هر پیام ack به ازای دریافت پکت خود باعث اشغال پهنای باند خواهد شد .

TCP یک پروتکل قابل اعتماد برای دریافت و ارسال پکیت هست که به ان اصطلاحا connection-oriented می گویند یعنی به همان میزان و شکلی که پکیت رو به سمت یک دستگاه ارسال می کنیم به همان شکل و میزان هم پکیت رو دریافت می کنیم بدون هیچ تغییری ! اما پروتکل UDP بهش اصطلاحا connection-less می گویند قابل اعتماد نیست و هیچ گارانتی نشده که اطلاعات در فرایند تبادل به همان شکل و میزان باشند و ممکن است حتی دیتایی به مقصد نرسد . شما در یک زمان تنها می تونید یک ارسال و یا یک دریافت داشته باشید برای دیتا با حجم بالا خیلی کاربرد دارد مثلا سیستم های مبتنی بر VOIP ، یکی از سرویس هایی که بر روی این پروتکل کار می کند DNS هست …

یکی دیگر از مهترین فرق های این دو پروتکل این است که در پروتکل TCP به وسیله 3Way – Handshake ابتدا Connections برقرار می شود. در صورت برقرای بدون مشکل Connections سپس بسته ها به همان ترتیبی که توضیح داده شد ارسال می شود اما در UDP بدون اینکه هیچ گونه Connection ایی شکل بگیرد و به صورت کامل یکطرفه بسته ها ارسال می شود.

۰ نظر موافقین ۰ مخالفین ۰
رضا اسماعیلی

رفع مشکل پیغام access denied در اتصال در pstools

با 0 کردن این مسیر احتمالا مشکل حل می شود :

HKLM\SOFTWARE\Microsoft\Windows\CurrentVersion\Policies\System\EnableLUA

۰ نظر موافقین ۰ مخالفین ۰
رضا اسماعیلی

چگونگی ایجاد کلید ریجستری در کلاینت ها workgroup

How to Create, Modify and Delete Registry Keys Using GPO

The settings the majority of applications and a lot of Windows tweaks are not subject to centralized management using Group Policy (GPO), but often these settings can be configured in the registry. In this article, we’ll consider how to centrally add, modify and delete register keys on the domain computers using Group Policies.

Initially the group policies do not have an integrated feature to manage any register key. So administrators have to use such time-consuming methods like creating their own GPO administrative (.adm / .admx) templates (an example of GPO with .admx template for Google Chrome) or Logon scripts.

In Windows Server 2008, Microsoft released a group policy extension called Group Policy Preferences — GPP.  GPP also allow to manage registry parameters, i. e., to add keys, items and their values, as well as delete or change them. Let’s deal with these features in detail.

Suppose, that we need to disable automatic driver update in a certain OU on all PCs by modification ofSearchOrderConfig key inHKEY_LOCAL_MACHINE\SOFTWARE\Microsoft\Windows\CurrentVersion\DriverSearching branch of the registry. There are two ways to set a register key on target computers: using a registry browser integrated in the GPP console on remote computers or manually by selecting the branch and the key. Let’s dwell on the first way to begin with:

  1. Start Group Policy Management Console (gpmc.msc)
  2. Create a new (or edit the existing) GPO, assign it to the necessary container (OU) in AD and edit it
  3. Expand GPO Computer (or User) Configuration -> Preferences -> Windows Settings -> Registrysection and select New -> Registry Wizard in the context menuGPP console Registry Wizard
  4. The Registry Wizard allows to connect to the registry on a remote machine and select the existing registry key
  5. Specify the remote computer you want to connect to and select the existing key and registry branchRemote registry browser

    Note. If the error The network path was not found appears when you try to connect to a computer, most likely your computer is turned off or Remote Registry Service is not started on it.  The network path was not found To start the service manually, run these commands:sc config remoteregistry start= demand

    net start remoteregistry
    start remoteregistry service

  6. Using Remote Registry browser, select a key or keys of the registry to be set using GPO.

Note. On the remote PCs, this browser allows to select keys only from HKEY_LOCAL_MACHINE and HKEY_USERS branches. If you have to set keys located in other registry branches, you will have to install RSAT on a remote machine. Then start gpmc.msc on this PC and select required keys.

  • In our example we want to import to GPP only one item — SearchOrderConfig.Select registry item in registry browser
  • This item is imported to the GPP console; later you can change its value and the desired action (this will be considered further).GPO registry update item
  • Thus, you have created a GPP policy and in some time this key will be created on all computers subject to this policy. (If the policy does not work on the client, you can use GPResult for diagnostic purposes.)


You can create, delete or update the value of the registry key using GPP by specifying the registry branch and the key value manually.gpp new registry item

  • To do it, select New->Regisrty Item
  • In Hive, Key Path, Value Name, Value type, Value data fields, specify the registry hive, branch, name, type and value of the key.registry item properties
  • By default, the key is set in the Update mode.

4 types of actions are available for keys:

registry item actions

  • Create creates a registry key. If the parameter already exists, its value is not changed.
  • Update (by default) updates the value of an existing parameter according to the GPP. If there is no key, it will be created.
  • Replace deletes and creates the registry item anew (rarely used).
  • Delete deletes a key.

There is a number of other useful features in the Common tab:

common options

  • Run in logged-on user’s security context (user policy option) — a key is created only in the current user context. (It is possible only for GPP in the user section of the policies.) If a user doesn’t have the administrator privileges, he won’t be able to write anything to the protected system registry keys
  • Remove this item when it is no longer applied – if the policy is no longer applicable to a client, the key is automatically deleted
  • Apply once and do not reapply – a policy is applied to a PC only once. Later it won’t be reapplied
  • Item-level targeting – the opportunity of more accurate policy targeting on the clients

Here is the resulting report containing policy settings in the GPMC.

GPMC policy report

Note. In Windows XP and Windows Server 2003 (no longer supported), there is no GPP section in the policy editor, and consequently, it is not applied. To add GPP features to these OS versions, you have to install the update KB943729 (Group Policy Preferences Client Side Extensions).

۰ نظر موافقین ۰ مخالفین ۰
رضا اسماعیلی